
So lets say you decided to give it a try and get started and buy your first NFT as a user. With the crypto & NFT space being in its early stages, the customer experience and usability still has to develop to reach mass adoption. Therefore, if you read this you are an early adopter. Congrats.
There are 4 tasks involved in buying your first NFT:
- Set up your wallet
- Create account on NFT platform
- Fund your wallet
- Buy your first NFT
Note: Please make sure you understand the risk involved in buying cryptocurrencies, NFT etc. DYOR and I am not a financial adviser.
Task A: How to setup your metamask wallet.
In this example, I use metamask as it is the most widely used wallet.
Step 1) Go to metamask.io
Step 2) Click on Download now.

Step 3) Select your OS (operating system) and click on install. There are 3 possibilities: a.) a Google Chrome Extension (added to your google chrome browser which you will need) b.) Android App or c.) iOs App. For starting, it might be easiest to download the app but the best & safest way to use it is via the Google Chrome Extension. We will choose the Google Chrome Extension.

Step 4) Click “Get started”
Step 5) Click “Create a wallet” (if you already have an metamask wallet you can import it using your secret recovery phrase)
Step 6) Create a password: this will be the password that you use to unlock the wallet and access its funds. Click to agree terms.
Step 7) View & store secret recovery phrase. Best store it offline on a piece of paper or cryptosteel.
Step 8) Congrats! You have successfully installed your first metamask wallet.
Task B: Make an account on an NFT platform of your choice (here: Opensea)
Metamask supports all platforms connected to the Ethereum or Polygon network. If you intend to buy and sell NFTs on the the Solana or Cardano blockchain you will need a different wallet supporting the respective token that is used by the blockchain ($SOL or $ADA). For this example, I will use the most popular platform “Opensea” to illustrate how to make an account.
Step 1: Go to Opensea.io
Step 2: Go to Account section on the top right section of the page & click profile

Step 3: Choose metamask as your wallet to log in

Step 4: Use your wallet password to access your metamask and log in to opensea.
Step 5: After logging in, you can adapt your profile if you like (e.g. change profile name, profile picture etc.) Just click on Settings.
Task C: Fund your wallet
There are 2 ways how you can fund your metamask wallet. Either via an existing wallet or exchange account or direct via your credit card.
Option 1: You can transfer crypto from another wallet or an exchange
Step 1: Log in to your metamask. Click on the address on top to copy it.
Step 2: Then go to your exchange/wallet and log-in.
Step 3: Once you are logged in, you need to use the withdraw/send function to transfer crypto. In my example I am using an exchange so I have to click on “my Assets” > “Account”.

Step 4: Click on “withdraw”. Preferably you choose Ether as the crypto you want to transfer.

Step 5: Fill in the form. Add the Public key of your metamask wallet to the field “address” (double check whether it is correct), add the amount and withdrawal remarks. Then click on submit. Since you control your public and private key with the metamask wallet there is no need to give input to the “memo” field. It is advisable to send small amounts of crypto to test whether you have done it right. (for explanation: the “memo” field is an additional feature necessary for identifying a transaction recipient beyond a wallet address. It is mostly needed when you send crypto to an exchange, as it uses one address for all traders of cryptocurrencies and then uses the memo to determine what actual individual account a given transaction should be assigned and credited too. Think of it like your apartment building address. The Memo identifies which specific apartment you live in, in the apartment building.

Step 6: Hit submit. For security purposes, you will be asked by your exchange to confirm the transaction by inputting a short code that they send you via mail. If you have set up an authenticator app you will need to input this code as well.
Option 2: Fund your metamask wallet by using your credit/debit card
Step 1: You can either fund your metamask wallet by using the built-in support of the service “Transak” / “Wyre” or you can create a Opensea account and then fund your metamask using the service “Moonpay”. As we already have an opensea account we will use Moonpay.
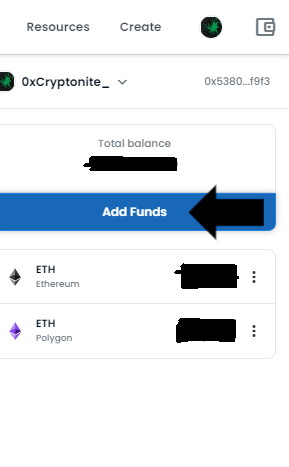
Step 2: Log into Opensea and click on “wallet” on the right-hand side of the site.
Step 3: Click on “Add Funds”
Step 4: Select “Buy with card”

Step 5: Select the crypto that you want to buy.

Step 6: Choose the amount you want to purchase. Click on “next”.

Step 7: If you use moonpay the first time, you need to give some credentials to moonpay (KYC = know your customer) and input your card details. If you have used moonpay already, it will just prompt you to verify the transaction.
Step 8: Swooosh! You get an e-mail confirming your order and your coins will be in your wallet in a few minutes. You will be notified via mail.
Task D: How to buy your first NFT
Now that you have setup your crypto-funded metamask wallet and setup your opensea account you can buy your first NFT.
Step 1: Log into Opensea.io
Step 2: Search for an NFT piece that you want to buy & is listed for sale. (Disclaimer: NFTs are high risk and I am not a financial adviser. The example used is purely for educational purposes. I am not affiliated to the collection used in this example and I also recommend to DYOR and only invest money that you can afford to lose)
Step 3: When you have found a piece, click on “Buy Now”.

Step 4: Opensea has already reviewed some collections, whereas many are not. So most of the time you need to agree on the bottom that this collection was not reviewed and that blockchain transactions cannot be undone. Again DYOR!

Step 5: Press “Confirm checkout”

Step 6: Press “Sign Message”

Step 7: Confirm Signature with wallet

Step 8: Purchase Success!

Conclusion
As mentioned, the customer experience cannot be compared to amazon or other outlets. However, you will not regret having taken this steps, as the potential for gains is enormous. As they say in the NFT space: "One NFT can change your life!"
I hope you learned something today and would love you to consider following me on my twitter @0xCryptonite if you like more recent updates about the space.